Embroidery Patches Types: The 2026 Guide Crafters Are Actually Using
Most crafters pick the wrong patch type — and they don't find out until the iron-on backing peels off a school uniform after three washes, or the chenille badge turns up looking like a flattened hedgehog on a jacket it was never meant for.
Here's the thing: not all embroidery patches are the same thing with different names. They're genuinely different products — different construction, different materials, different attachment mechanics — and treating them as interchangeable is how you end up with a garment that looks worse than when you started. I've digitized enough patches to tell you that the decision you make at the "which type do I need?" stage affects everything downstream: durability, how the finished piece washes, whether it sits flat or bubbles, and whether it's even appropriate for the fabric underneath.
This guide covers the core construction types, attachment variants, the specialty formats that most beginner content completely ignores, and a practical framework for matching patch type to project. No filler. Just the stuff that actually matters.
The Five Core Patch Construction Types — And What Each One Actually Does
Let's start at the construction level, because this is where most guides go thin.
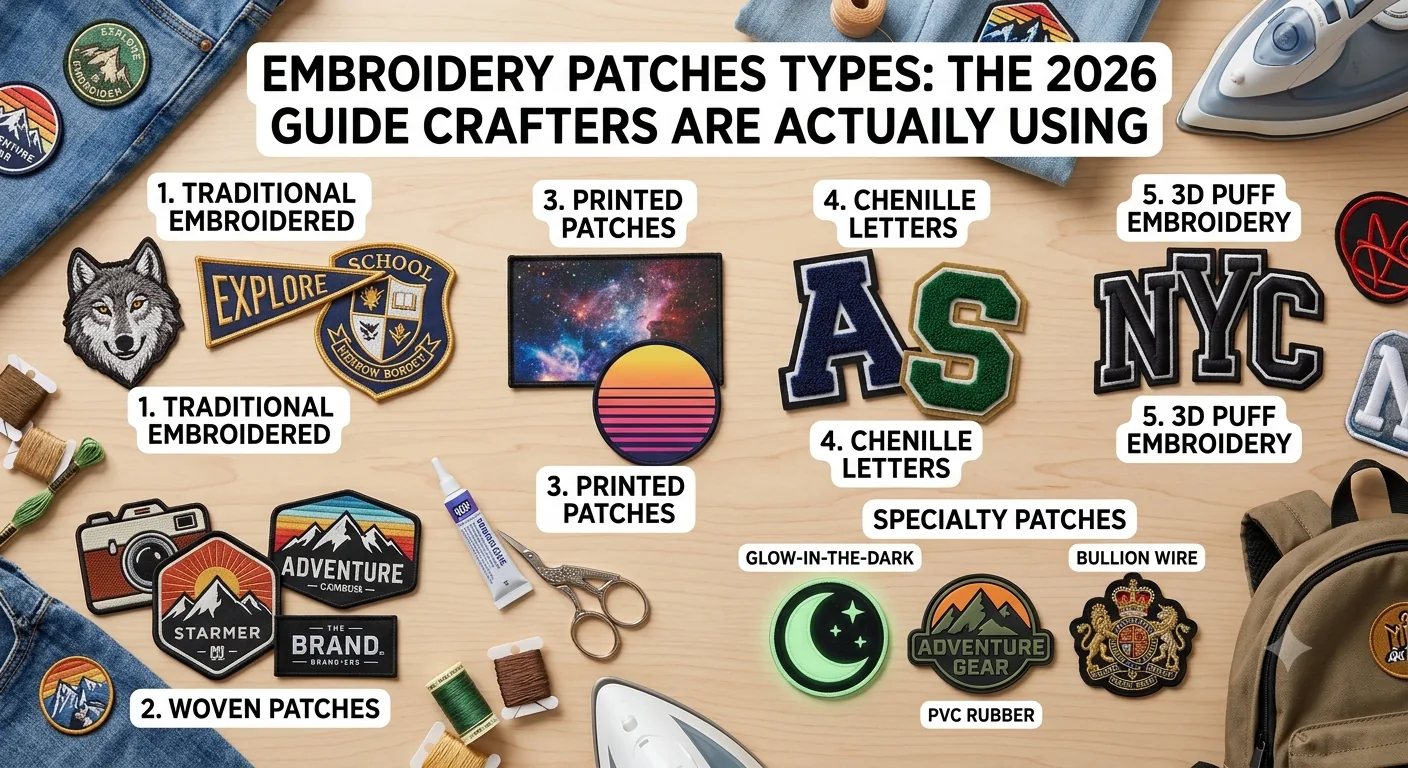
1. Traditional Embroidered Patches
Traditional embroidered patches are what most people picture — thread stitched onto a twill or felt base, usually with a merrowed (overlocked) border. The design is built entirely from stitches. A typical small logo patch might run 4,000–8,000 stitches depending on complexity and size. The aesthetic is textured and raised. These are durable, washable, and the most widely produced patch type in commercial embroidery. They're also the type I spend most of my time digitizing — and where file quality matters most. The file is the problem, not your machine. A poorly digitized embroidered patch will bunch, pucker, and bleed colours into each other regardless of how good your machine is.
2. Woven Patches
Woven patches are different in a way that surprises most people. Instead of thread being stitched onto a base fabric, the patch is the fabric — the design is woven directly into the textile on a Jacquard loom. This means you can reproduce much finer detail. Text down to 3mm is achievable on a woven patch; on an embroidered patch, anything under 4.5mm starts getting risky. If it won't stitch clean at 4mm, redesign it — or switch to woven. These are common on clothing labels, scout badges, and premium brand patches where sharpness matters more than texture.
3. Printed Patches
Printed patches use dye-sublimation or screen printing onto a base material. They're flat, reproduce photographs and complex gradients, and are significantly cheaper to produce in small runs. The trade-off is durability — they fade faster, especially with repeated washing. I wouldn't put a printed patch on anything that's going through a commercial wash cycle weekly.
4. Chenille Patches
Chenille patches are the thick, velvety ones — typically varsity letters and sports team patches. They use looped or cut yarn tufted into a felt backing to create that raised, soft texture. They're large by nature; the construction doesn't scale down well. You'll see these most commonly on letterman jackets, and there's a good reason for that.
5. Bullion Patches
Bullion patches are the proper hand-crafted end of the market — gold or silver wire coiled and stitched to create crests and insignia. Military, regimental, and formal tailoring. Time-intensive to make, expensive, and not something most crafters will produce at home. But you should know they exist because clients occasionally ask for the look, and a digitized embroidered approximation is not the same thing.
Why Attachment Method Is Just as Important as How the Patch Is Made
Here's the thing: the same embroidered patch can ship in four completely different attachment variants, and choosing wrong can ruin the project even if the embroidery itself is perfect.
Sew-On Attachment
Sew-on is the most durable option. Full stop. A properly sewn patch — stitched around the entire perimeter — isn't going anywhere. It withstands commercial laundering, outdoor use, and the general abuse of kids and working environments. If longevity matters more than convenience, sew-on is the answer. The downside is time and the need for a machine or hand-stitching skill.
Iron-On (Heat-Adhesive Backing)
Iron-on (heat-adhesive backing) is what most retail patches use. A thermoplastic adhesive is applied to the patch back; heat and pressure activate the bond. It's convenient — genuinely useful for quick applications on cotton and denim. But iron-on is not a permanent solution on its own. In my experience running production, I always tell customers: iron-on gives you positioning, sewing gives you permanence. Use both. The adhesive alone will lift at the edges after repeated washing, especially on curved seams, stretch fabrics, or anything going above 60°C in the wash.
And it won't bond properly to nylon, polyester, or technical fabrics at all. The heat required to activate the adhesive properly — typically 150–160°C applied for 10–15 seconds with firm pressure — risks damaging those materials before the bond sets.
Velcro-Backed Patches
Velcro-backed patches are standard in tactical, military, and workwear contexts where patches need to be swapped out frequently. The patch carries the loop side; the garment has hook panels. This is genuinely practical for uniforms where the same jacket gets different mission or rank insignia. For craft projects, velcro patches have found a solid niche in bag customisation — you can rotate patches on a rucksack without committing. The attachment is secure enough for normal use but obviously not suitable for anything needing wash-cycle durability.
Self-Adhesive (Peel-and-Stick)
Self-adhesive (peel-and-stick) patches are the weakest option mechanically. Fine for temporary applications — events, prototyping, craft displays — but I wouldn't use them on anything you expect to last beyond a few days of handling.
Fabric Compatibility and Considerations
One thing most guides miss entirely: fabric weight and weave structure affect which attachment method works. A sew-on patch on loosely woven linen needs interfacing behind the attachment area or you'll get puckering around the perimeter stitches. An iron-on patch on a thick canvas needs longer dwell time and higher pressure to get full adhesion. Context always matters.
Specialty Patch Types That Most Beginner Content Completely Ignores
This is where things get interesting — and where most embroidery patch content stops short.
3D Puff Embroidery Patches
3D puff embroidery patches use a foam insert — typically 3mm or 6mm EVA foam — placed under the top stitching so the embroidery rises visibly off the base. The effect is dramatic: logos and lettering sit proud of the surface by several millimetres. It's extremely popular on snapback caps and premium streetwear. Digitizing for puff is different from flat embroidery: you need higher stitch density, wider column stitches (typically 4mm minimum — anything narrower won't cover the foam cleanly), and specific underlay that anchors the foam without showing at the edges. I've digitized enough of these to tell you that auto-digitizing software handles 3D puff about as well as it handles most things — badly. Do it properly or the foam peeks through at curves and the client sends it back.
PVC Rubber Patches
PVC rubber patches aren't embroidered at all — they're moulded synthetic rubber with colour-filled recessed areas. They look like a chunky sticker in the best possible way. Extremely durable, waterproof, and popular on outdoor gear, military kit, and bags. You can't make these at home with standard equipment; they require casting or injection moulding. But crafters encounter them as purchased components, and knowing the difference between a PVC badge and an embroidered one matters when a client hands you a sample and asks for "the same thing."
Laser-Cut Patches
Laser-cut patches are created by cutting fabric — often felt or leather — with a laser rather than scissors or a die-cut press. The cut edges are clean and sealed by the heat of the laser. These can be embroidered on top or used as die-cut silhouette patches without any stitching. For leather patches in particular, laser cutting produces edges that would take hours by hand.
Glow-in-the-Dark Embroidery Patches
Glow-in-the-dark embroidery patches use phosphorescent thread — it charges under UV or ambient light and emits a green or blue glow in darkness. Thread brands like Madeira and Robison-Anton both offer phosphorescent options in their commercial ranges. The glow effect is subtle rather than theatrical, and the thread does behave slightly differently under tension, so you may need to adjust upper thread tension marginally. Useful for children's clothing, novelty items, and safety applications.
Vintage and Hand-Embroidered Patches
Vintage and hand-embroidered patches sit in a category of their own. Chain-stitch patches produced on vintage Cornely machines have a distinctive texture and movement that no modern embroidery machine fully replicates. If a client wants authentic vintage aesthetics, they're looking for patches that were either produced decades ago or made on vintage equipment by someone who knows what they're doing. Managing those expectations early saves a lot of back-and-forth.
Choosing the Right Embroidery Patch Type Without Second-Guessing Yourself
Decision paralysis is real in this space. Too many options, not enough clear guidance. So here's how I actually think through patch selection.
Key Factors to Consider
1. Start with the fabric
Stretch fabrics and technical synthetics rule out iron-on as your sole attachment method. Loosely woven or delicate fabrics need sew-on with backing. Heavy canvas and denim handle anything. If the fabric can't take heat, you're sewing.
2. Consider wash frequency and conditions
A patch on a work shirt going through fifty commercial washes a year needs sew-on construction and a durable backing — I'd specify a non-woven cutaway stabiliser on the patch itself and a full perimeter sew-down on application. A decorative patch on a display jacket that never goes near a washing machine? Iron-on is fine.
3. Match the aesthetic to the construction type
You want photographic detail or gradients? Woven or printed — not embroidered. You want tactile texture and dimensionality? Embroidered, or 3D puff for maximum presence. Varsity letterman aesthetic? Chenille, full stop. Formal regimental crest? Either bullion wire or a very well-digitized embroidered approximation with metallic thread.
4. Think about skill level honestly
Sew-on gives the best result but requires sewing competence. Iron-on is accessible to beginners. 3D puff digitizing is advanced territory — if you're new to digitizing and attempting puff on a cap, test stitch first. Always. I mean it every time I say it.
Quick Reference Guide for Common Scenarios
For quick reference, here's how the main types map to common project scenarios:
-
Denim jacket customisation: Traditional embroidered, sew-on or iron-on + sew perimeter. Chenille if you want the letterman look.
-
Children's school uniform: Sew-on exclusively. Iron-on alone won't survive the wash cycle. Woven patch if detail is required.
-
Tactical/workwear: Velcro-backed embroidered patches. Swap in, swap out.
-
Premium streetwear branding: 3D puff embroidered on twill base, sew-on application.
-
Outdoor and adventure gear: PVC rubber patch — waterproof, doesn't absorb, handles abrasion.
-
Craft display or memory quilts: Sew-on embroidered or vintage hand-embroidered. No adhesive near textile art you're keeping.
Resources
For resources: if you're sourcing commercial embroidered patches, organisations like the Embroidery Trade Association publish guidelines on construction standards. For digitizing your own patches, the manual for your specific software — whether that's Wilcom EmbroideryStudio, Hatch Embroidery, or Pulse Ambassador — will have patch-specific settings. And for understanding backing and stabiliser combinations, [LINK: complete guide to embroidery stabilisers] is worth reading before you start.
[LINK: how to digitize text for embroidery patches] is essential if you're working with lettering under 6mm — small text is where most DIY patch digitizing falls apart.
The Verdict
If you're choosing between embroidery patches types for a real project in 2026, don't let the variety paralyse you — use the two-axis framework: what's the construction type, and what's the attachment method. Those two decisions together determine whether your patch lasts and looks right. For most garment applications, a traditionally embroidered patch with sew-on attachment is the correct default. Deviate from that when you have a specific reason — swap versatility, extreme detail requirements, waterproofing — not just because another option looks interesting. [LINK: guide to patch backing materials] will help you get the attachment side right once you've settled on construction. Save yourself the ripped-out stitches by making the right call before you commit.
Frequently Asked Questions
What's the difference between an embroidered patch and a woven patch?
The construction is completely different, even if the end result can look superficially similar. An embroidered patch is thread stitched onto a base fabric — you're building an image out of stitches layered on top of a substrate. A woven patch is woven on a Jacquard loom where the pattern is integral to the fabric itself; there's no base and no surface stitching. Practically speaking, woven patches reproduce finer detail — text and thin lines that would be impossible to digitize cleanly at small sizes for embroidery. Embroidered patches have more texture and dimensionality. Both are durable, but woven patches lie flatter and are typically used where brand consistency and sharpness matter most.
Are iron-on patches actually permanent?
No, and I'd push back on the word "permanent" being used on most iron-on patch packaging. The heat-adhesive backing creates a strong initial bond on appropriate fabrics — primarily cotton and denim — but it degrades with repeated washing, especially above 40°C, and it lifts at edges with mechanical stress. The professional approach is to iron first for positioning, then sew around the perimeter. That combination is as close to permanent as you'll get without purely sewing from the start. On stretch fabrics, nylon, or polyester, iron-on simply doesn't work reliably — the adhesive won't bond cleanly and any bond achieved is fragile.
Does patch type affect how collectable or valuable it is?
Yes, meaningfully so. In the collector market — scout badges, military insignia, vintage brand patches — construction type directly affects value. Bullion wire patches, authentic hand-embroidered vintage badges, and chain-stitch patches produced on Cornely machines carry premiums that modern machine-embroidered reproductions don't. Collectors in the militaria and scouting communities specifically seek out original construction; a modern machine-embroidered reproduction of a vintage badge isn't the same thing regardless of how close the design is. If you're buying patches with resale or collection value in mind, know what you're looking at and ask about construction method explicitly.
Can I make 3D puff patches at home?
Yes, with the right setup. You need an embroidery machine capable of reading your file format, appropriate digitizing software, EVA foam in the right thickness (3mm for subtle lift, 6mm for pronounced relief), and enough experience with the digitizing process to set up the file correctly. 3D puff is not a beginner project. The foam needs to be cut slightly smaller than the design element it's supporting, the stitching needs sufficient density and column width to cover it cleanly, and the underlay approach is different from standard flat embroidery. If you're new to digitizing, run several test stitches on scrap fabric before attempting puff on a final garment. Test stitch first. Always.
What's the most durable patch type for clothing that gets heavy use?
For heavy-use garments — workwear, uniforms, children's clothing — a traditionally embroidered patch on a cut-away stabiliser base, applied by sewing around the full perimeter, is the most durable combination in my experience running production. The cut-away backing keeps the patch stable through repeated washing and mechanical stress; the full sew-down prevents any edge lifting. PVC rubber patches are arguably more physically durable in terms of abrasion resistance, but they're heavier and less comfortable on clothing worn close to skin. For purely practical longevity on fabric garments, embroidered sew-on is the answer.
OurDigitizer Editorial Team · Editorial Team
Written and reviewed by the OurDigitizer editorial team — embroidery digitizers with 12+ years of combined manual digitizing experience across DST, PES, and all major embroidery machine formats.